GO FISHING, use SLABSAUCE Fishing Attractant
Page 1 of 3 123 LastLast
Results 1 to 10 of 25

Thread: PROCEDURE: V8 Clutch Job - Simple tools

  1. #1
    Join Date
    Oct 2006
    Location
    Reading, UK
    Posts
    1,853

    Default PROCEDURE: V8 Clutch Job - Simple tools

    Basically a clutch job on a v8 is very straightforward, if a little long - winded.

    It drops into 5 steps:

    1) Remove Exhaust system
    2) Drop propshaft and remove clutch slave
    3) Lower engine onto support
    4) Pull gearbox off back of engine
    5) Remove clutch (and flywheel if you need to)

    1) Exhaust system:

    Seems an easy task, but may possibly be one of the longer winded processes here.

    • Pull all the manifold-cat fixings - these range from 12-13 mm - however they rust extremely badly, so you'll need to hammer a 12mm onto most of the outer fixings. Remove the cross brace off the back of the gearbox, 13mm spanner required due to the limited access
    • Prop the underside of the centre box, not the cats - the centre box is the centre of gravity on the whole system.
    • Unhook both centre rubber mounts
    • Drop the locking bolts out of the back box, make sure you've got something underneath to prop it with.
    • At this point you'll need an assistant with a BFH under the front of the car, while you grab the tail pipes and yank. The assistant uses the BFH to 'persuade' the rusted solid joints to come apart.
    • The exhaust system will now flex annoyingly over the prop, so there's a tricky manouver of lifting it both ends, removing the centre box prop and lowering it to the floor.
    • CARDBOARD UNDER THE CATS PLEASE! If your cats are anything like mine, they'll have been scratched to sh!t by years of speed bump abuse, dragging them over a hard floor may finish them off, so be careful!


    2: Propshaft

    Brute force time! I found that a rattle gun/impact wrench couldnt physically get in the gap to remove these, but mine *is* an electric one - air ones tend to have a flat top for better access.

    The home mechanic is going to have to muscle up and get a 1.5 meter breaker bar though.

    • Rear wheels should be off the ground to allow you to rotate the propshaft by hand
    • You need a 21mm spanner, 21mm socket and the biggest breaker bar you can find
    • One at a time, put the 21mm spanner on the nut, and brace it against the side of the transmission tunnel - this would be passenger side in a US car, or driver side in the UK. PAD IT, I didnt the first time and it removed paint off the trans tunnel!
    • Get your breaker bar in and as Barney says 'Gorilla it' - If you're working on jackstands, and you've got a massive breaker bar - access is limited, and we found it helps if you and your assistant both push the breaker bar around the first time due to the odd angles involved
    • Remove all 6 bolts in one go - the propshaft will not drop yet, and dont try making it.
    • Remove all the heat shielding under the propshaft, requires 13mm ratchet/spanner and 9/10mm spanner
    • Person 1 stays under the guibo area, person 2 locates under the centre bearing and removes the centre bearing bolts
    • Carefully lower the centre bearing, while person 1 wiggles the front of the propshaft until it jumps free off its locating bearing
    • Re-bolt up the centre bearing again to support the shaft and push the front of the shaft to one side.
    • Dont panic about the centre bearing supporting the weight of the shaft... it's been doing it for the last 15 years
    • Discard the guibo unless you've changed it less than 6 months ago - you'll only end up regretting it if you dont
    • Extract the gearbox output bolt lock and place to one side
    • Remove the two 13mm bolts out of the clutch slave cylender and drop it out and push to one side.


    3: Lower the engine

    This is the bit that scared me the most in the whole damn job... lowering the engine to sit on its sump on the crossmember. I've never actually moved an engine on its mounts before, so this was a new experience for me.

    Before you lower the engine:
    I hear people constantly ranting about how much hard work it is to get the top bolts out of the gearbox once it's lowered.

    The key here is to remove the bolts from the top before you lower the engine.
    If you spend 5 minutes stripping stuff out from the firewall under the bonnet, your life is going to be soooo much easier:

    In fact remove all the bolts bar the bottom two before you lower the engine:


    You'll need two TORX bits for this, a T12 and a T10, the above groups #1, #2 and the upper of #3 can be accessed by dropping a long breaker bar in through the top, with an assistant under the car positioning the driver onto the torx heads.

    Make sure the driver seats properly, torx bolts are notorious for stripping if the driver doesnt seat correctly!

    Group #3 have 16mm bolts on the back of them as this is the alternate location for the starter depending on region. For some reason my starter also had an M15 bolt stuck through it, dont know why!?

    Remove all the bolts apart from group #4, now we can begin lowering the engine...

    • You need to find yourself a decent prop, a block of wood is good, but better is an old yellow pages :-D - it's soft but hard enough to support the sump
    • Drop the anti roll bar, the gearbox will interfere with it
    • Place your prop between the sump and the crossmember
    • If you've not already done so, unbolt the connector mounting for the O2 sensor connections and unplug the reverse sensor plug - push to one side
    • Remove the gearknob and gaiter inside the car, unclip the rubber boot around the selector shaft
    • Unclip the selector lever from the bottom of the shift lever - doing this will allow the shift lever to move outside its normal movement arc and cleanly drop out of the car
    • Put a good trolley jack under the back end gearbox mount and drop out the four M13 bolts through it
    • Gradually lower the jack with an assistant (one who's willing to get doused in 8 litres of oil if things go to hell) listening *very* closely for any cracking noises or odd noises as the engine settles onto your chosen prop - some creaking and odd metallic noises are expected as the manifolds hit the heatshields. If you hear a cracking noise, jack the jack back up a little bit and get the hell out - dont take any risks! Crawl back under and carefully check for cracks/leaks.
    • Once the engine settles, for now leave the jack just under the end of the gearbox as support.


    Last edited by Ferret; 06-29-2008 at 11:29 AM.

  2. #2
    Join Date
    Oct 2006
    Location
    Reading, UK
    Posts
    1,853

    Default

    4: Remove the gearbox
    Now comes the fun part, getting the gearbox out.

    The 6 speed is the heaviest of the bunch, but only weighs in at 46kilos (101.4 pounds), so isnt that heavy, one guy can lift it easily. Two make mincemeat out of it.
    It can be done one of two ways, the first being preferable:

    Two people:
    • Remove the remaining bolts, the clutch will easily support the weight of the box
    • Get one person under the front of the box, one under the back and a jack supporting the middle of the box
    • Slide the box backwards slowly and let the weight rest on the jack for a moment
    • Both lift the box, kick the jack out of the way and lower it to the ground slowly, being careful not to drop it onto the drain plug


    One Person:
    I've tried this - if you're really short of something decent to place the box on for support you can lower the box carefully onto yourself by bracing the bellhousing on your knees and 'bench pressing' the back end of the box down onto your chest. Here's the trick - the drain plug sticks out significantly, you either need to pad it or make sure you're not gonna puncture yourself with it somehow!
    I would NOT advise doing this if you're a small person, but if you've got some strength, this may be the easiest way to get the box out. Watch out you dont drop the bellhousing end of the box though - it'll be extremely painful!

    Make sure there's some cardboard or the like under it, and drag the box out from under the car. You may need to raise the car slightly to do this though.


    5: Removing the clutch

    WEAR GOGGLES OR SUNGLASSES WHILE REMOVING THE CLUTCH
    I didnt and ended up scratching my eyes to sh!t, a *lot* of crap will fall out of the clutch as you take it apart and you're directly under it.

    Once you've got the box off and out of the car, you can remove the clutch plate
    • From underneath you'll need an 8mm hex drive
    • Gradually, working in a circular rotation unbolt the retaining bolts around the outside edge of the flywheel
    • If your clutch has any life left in it, the pressure plate should easily push itself off the flywheel... mine didnt!
    • If your clutch is at the end of its life (like mine) you'll have to very carefully lever the pressure plate off the flywheel with a blunt object - again do this in a circular manner to avoid wedging it solid.
    • The pressure plate is damned heavy, dont smash yourself in the face with it when it does come off
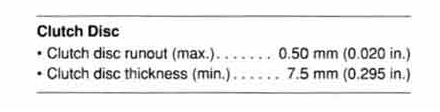
    • Extract the clutch plate and remove from under the car, the plate should be a minimum of 7.5mm thick (- thanks stilljester)
    • You're now ready to remove the flywheel, you need an extended T50 (-not T60 as stated everywhere, Ross) torx driver to do this and something to lock the crank with - again this is damn heavy
    • Breaker bars at the ready - these bolts will be in hard!


    I'd advise changing the crank rear seal while you're at it, I've not had a go yet but apparently it's easy on the V8 as you dont have to pull the sump.
    Last edited by Ferret; 06-29-2008 at 08:59 AM.

  3. #3
    Join Date
    Oct 2006
    Location
    Reading, UK
    Posts
    1,853

    Default

    Inspection
    Have a look at the faces of the pressure plate and the flywheel - if you can see heatspots and 'smearing' the flywheel will probably need resurfacing.


    With mine I'm just going to clean the surface of the flywheel with some ultra fine grade wet and dry paper and ignore the obvious minor runout that's happening. I'll do the job again in 6 months and put a brand new flywheel in. I didnt think this job was quite as easy as it was!

  4. #4
    Join Date
    Oct 2006
    Location
    Reading, UK
    Posts
    1,853

    Default

    Some thoughts:
    The first time you do this, it's going to take you all day - we started at about 11am and didnt finish till 7pm - and that was just getting everything apart. We've gotta wait for the parts places to open on monday to get a new clutch.

    Prepare to be sore - if you're doing this on the floor on your back - you end up using muscle groups contorting around under the car you're not used to. You *will* be sore afterwards!

    Protect your eyes - I didnt realise it, but when I got back inside 'her indoors' just cracked up - my face was black from the amount of crap that had just fallen on it!
    These cars are big and heavy - watch out as apparently small components can just suddenly come at you with a lot of force

    Take your time! It's not a race and you'll end up screwing something up. Also if something's excessively difficult to do, there's usually another way to do it!

    Also I noted that my clutch pedal was rumbling while pushed down - when I took the release bearing out, it wasnt running straight, somehow it'd been bent off at an angle!


    I'll write this up onto bmwe34.net if you guys want!

  5. #5
    Join Date
    Apr 2006
    Location
    Chicago, Il. U.S.A.
    Posts
    4,243

    Default

    Ferret,
    When you eventually remove the flywheel you will need a long reach T50(not T60 as some books and even BMW sources will say) bit for the bolts.
    I went through a very frustrating few days F'ing around buying cheapo ones, 3 of 'em, grinding the hex shafts down to penetrate into the recesses. Every one wanted to walk out of the bolt heads and eventually broke. I was lucky not to strip the bolt heads, you can imagine what a nightmare that would have been. Finally got the proper bit loaned to me, it and an also loaned GOOD impact removed those bolts chop,chop.
    "The gas pedal wouldn't go to the floor if it weren't meant to be there"

  6. #6
    Join Date
    Nov 2006
    Posts
    184

    Default

    Quote Originally Posted by Ferret View Post

    <Can someone tell me what the minimum clutch thickness is here please?>
    1992 525i Touring M50 5spd Manual 230k+ miles - SOLD:-(

  7. #7
    Join Date
    Oct 2006
    Location
    Reading, UK
    Posts
    1,853

    Default

    Quote Originally Posted by stilljester View Post
    Ah-HA, excellent - this explains a lot - mine was down to 4.7int-5ext mm all round! No wonder it was slipping like . Cheers, I'll update the original post now.

  8. #8
    Join Date
    Oct 2006
    Location
    Reading, UK
    Posts
    1,853

    Default

    Quote Originally Posted by Ross View Post
    Ferret,
    When you eventually remove the flywheel you will need a long reach T50(not T60 as some books and even BMW sources will say) bit for the bolts.
    I went through a very frustrating few days F'ing around buying cheapo ones, 3 of 'em, grinding the hex shafts down to penetrate into the recesses. Every one wanted to walk out of the bolt heads and eventually broke. I was lucky not to strip the bolt heads, you can imagine what a nightmare that would have been. Finally got the proper bit loaned to me, it and an also loaned GOOD impact removed those bolts chop,chop.
    Cheers Ross, excellent tip there - I'll update the original post with this info. I may actually have a long reach T50 somewhere... didnt realise!

  9. #9
    Join Date
    Jan 2004
    Location
    Thunder Bay, Ontario
    Posts
    2,538

    Default

    Very well done. These are the things that come in very handy for first time (and second time......) DIY'ers.

    I think theres more room b/w the M60 and the firewall than with the M50.

    Dave

    10/90 Build 525im, 630,000+km, Eibach/Sachs, Engine Rebuild
    *RIP Oskar the DOG *

  10. #10
    Join Date
    Feb 2006
    Location
    Oldham, England
    Posts
    3,078

    Default

    Quote Originally Posted by Dave M View Post
    Very well done. These are the things that come in very handy for first time (and second time......) DIY'ers.

    I think theres more room b/w the M60 and the firewall than with the M50.

    Dave
    x1 on the M50 clearance. On that I would recommend removing the inlet manifold to get at the top bolts and the starter. There's also a dowel from the bellhousing into the starter flange that's a sod to shift. I'd also remove the exhaust at the manifold. Mine is ready to drop but rain stopped play. Great write up Ferret!!
    Last edited by whiskychaser; 06-29-2008 at 10:12 AM.

Page 1 of 3 123 LastLast

Similar Threads

  1. fan clutch test procedure
    By shogun in forum 5 Series BMW
    Replies: 0
    Last Post: 08-31-2009, 07:58 PM
  2. Installing Clutch master hard line??? Tips Tricks Tools?
    By attack eagle in forum 5 Series BMW
    Replies: 5
    Last Post: 03-06-2008, 01:49 PM
  3. simple questions...
    By txp135 in forum 5 Series BMW
    Replies: 9
    Last Post: 05-11-2007, 02:36 PM
  4. Simple Question
    By begeta50 in forum 5 Series BMW
    Replies: 2
    Last Post: 04-10-2007, 11:40 PM
  5. Fan clutch test procedure
    By shogun in forum 7 Series BMW
    Replies: 2
    Last Post: 08-24-2005, 10:52 PM

Posting Permissions

  • You may not post new threads
  • You may not post replies
  • You may not post attachments
  • You may not edit your posts
  •